haiscale (Highflyer AI Scale) 是一个轻量级的高性能并行训练工具库,其整合了幻方 AI 多年的并行训练研发优化经验,能够帮助 PyTorch 用户更加高效、便捷地在大规模集群上训练模型。
haiscale 中包含了以下几种工具:
haiscale.ddp: 分布式数据并行工具,以幻方 AI 自研的 hfreduce 通信为后端,相比于 NCCL 能够获得更好的多卡拓展性能;haiscale.fsdp: 极致优化Fully Sharded Data Parallel (FSDP)算法的实现,相比于 PyTorch FSDP 速度更快、占用显存更少;haiscale.pipeline: 分布式流水线并行(或称模型并行)工具包,包含 GPipe, PipeDream 等算法,支持多机多卡训练;haiscale.cpu_offload: 神经网络模型 Offload 工具,节省训练占用的显存。
下图展示了 haiscale 三种并行方式的性能,其相比 PyTorch 官方自带工具都有显著的性能提升:
用于测试的模型是 GPT-2 Medium,相关代码已开源至 hfai 模型仓库。下面将为大家简要介绍。
API文档:https://doc.hfai.high-flyer.cn/api/haiscale_ddp.html
示例模型:https://github.com/HFAiLab/hfai-models/tree/main/gpt
安装
haiscale 提供 Python 接口,通过如下方式安装:
-
如果要使用 haiscale DDP,首先需要先安装 hfreduce (如果不需要使用 DDP 可跳过这步):
sudo apt install libnuma-dev sudo apt install libibverbs-dev pip install hfreduce --extra-index-url https://pypi.hfai.high-flyer.cn/simple --trusted-host pypi.hfai.high-flyer.cn -
安装 haiscale:
pip install haiscale --extra-index-url https://pypi.hfai.high-flyer.cn/simple --trusted-host pypi.hfai.high-flyer.cn
haiscale.ddp
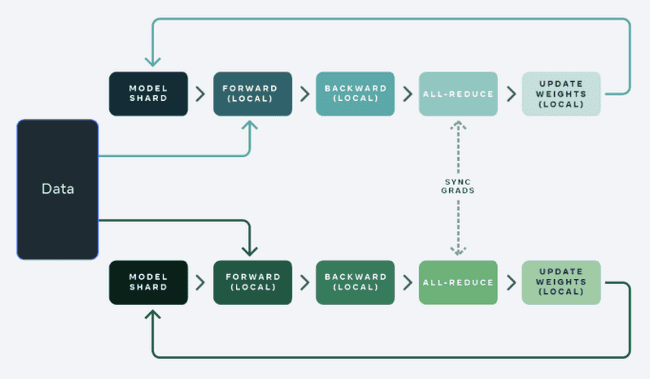
haiscale.ddp.DistributedDataParallel (haiscale DDP) 是一个分布式数据并行训练工具,使用 hfreduce 作为通讯后端,反向传播的同时会异步地对计算好的梯度做 allreduce。
haiscale DDP 的使用方式和 pytorch DDP 几乎相同,以下是使用示例:
from haiscale.ddp import DistributedDataParallel

model = MyModel().cuda()
model = DistributedDataParallel(model)
optimizer = torch.optim.Adam(model.parameters(), lr=0.01)

# training ...
for step, (x, y) in enumerate(dataloader):
    optimizer.zero_grad()
    output = model(x)
    loss_fn(y, output).backward()
    optimizer.step()

# stop hfreduce
model.reducer.stop()
如果需要做梯度累加,可以使用 model.no_sync() 来减少通讯的开销。注意只需要最后一次反向传播时做 allreduce:
from haiscale.ddp import DistributedDataParallel

ddp = DistributedDataParallel(model, ...)
with ddp.no_sync():
    for input in inputs:
        ddp(input).backward()  # no synchronization, accumulate grads
ddp(another_input).backward()  # synchronize grads
haiscale.fsdp
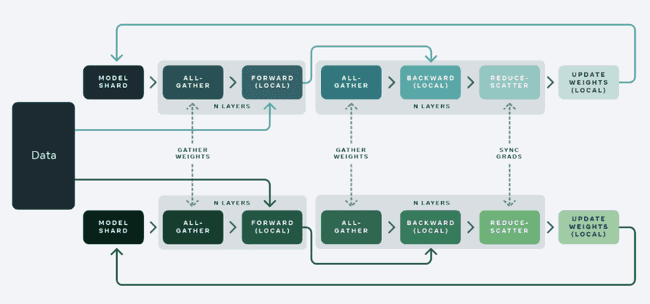
Fully Sharded Data Parallel (FSDP) 是 META 在 ZERO-3 的基础上提出的分布式数据并行工具,它把模型的参数进行切分并分散到不同的 GPU 上,每块 GPU 上只有 1/ngpus 的参数。在做前向和反向传播时,FSDP 会先做 allgather 获得完整的参数,然后在前向和反向传播结束后释放掉,只保留 1/ngpus 的参数和梯度。FSDP 通过参数分片的方式,能够减少模型参数、梯度、优化器状态的显存占用,帮助我们训练更大规模的模型。
haiscale.fsdp.FullyShardedDataParallel 的使用方法和 DDP 类似,但优化器必须在 FSDP 之后创建,并且保存模型参数的时候需要先调用 summon_full_params。以下是使用示例:
from haiscale.fsdp import FullyShardedDataParallel

model = MyModel().cuda()
model = FullyShardedDataParallel(model)
optimizer = torch.optim.AdamW(model.parameters(), lr=0.01)

# training ...
for step, (x, y) in enumerate(dataloader):
    optimizer.zero_grad()
    output = model(x)
    loss_fn(y, output).backward()
    optimizer.step()

# save checkpoint
with model.summon_full_params():
    if rank == 0:
        state = model.state_dict()
        torch.save(state, 'model.pt')
haiscale FSDP 还支持传入 auto_wrap_policy 参数,具体作用可以参考 PyTorch FSDP 的文档以及我们提供的 GPT-2 示例。
haiscale.pipeline
如上图所示,haiscale.pipeline 工具包中提供了三种流水线并行的算法:
GPipe: 把模型切分成ngpus份,所有 microbatch 的前向传播结束之后再做反向传播;PipeDream: 把模型切分成ngpus份,前向和反向传播交替执行(non-interleaved 1F1B);Interleaved1F1B: 把模型切分成ngpus * num_model_chunks份,前向和反向传播交替执行。
对于中等规模的模型(比如 GPT-2 Medium),我们推荐优先使用 PipeDream,相比于 GPipe 和 Interleaved1F1B 占用显存更少,速度更快。 对于超大规模的模型(比如 GPT-3),我们可以更加均匀、细粒度的切分它,这时候推荐使用 Interleaved1F1B。
haiscale.pipeline 提供了一个统一的 forward_backward 接口,我们需要传入损失函数 criterion 和标签数据 labels,损失函数会通过 loss = criterion(*outputs, *labels) 的方式调用,forward_backward 接口会返回一个元组 (losses, outputs),其中losses 代表每个 microbatch 的 loss 值,outputs 代表模型的输出。只有最后一个 rank 的进程能够获得 loss 和输出,其他进程得到的是 (None, None)。
下面通过示例展示 GPipe 和 PipeDream 的用法:
from haiscale.pipeline import GPipe, PipeDream, partition

dist.init_process_group(...)
torch.cuda.set_device(local_rank)
rank, world_size = dist.get_rank(), dist.get_world_size()
torch.manual_seed(12345)

def loss_fn(out, y):
    return ((out - y)**2).sum()

model = nn.Sequential(...)
model = partition(model, rank, world_size)

# chunks: number of microbatches
model = PipeDream(model.cuda(), chunks=32)
# or model = GPipe(model.cuda(), chunks=32)

for x, y in dataloader:
    losses, outputs = model.forward_backward(x, criterion=loss_fn, labels=(y,), return_outputs=True)
    if rank == world_size - 1:
        loss = losses.sum().item()  # losses: torch.Size([32])

# eval
with torch.no_grad():
    out = model(x)
    if rank == world_size - 1:
        # calculate metrics ...
以下是 Interleaved1F1B 的使用示例:
from haiscale.pipeline import Interleaved1F1B, partition

dist.init_process_group(...)
torch.cuda.set_device(local_rank)
rank, world_size = dist.get_rank(), dist.get_world_size()
torch.manual_seed(12345)

def loss_fn(out, y):
    return ((out - y)**2).sum()

model = nn.Sequential(...)
modules = partition(model, rank, world_size, num_model_chunks=2)  # len(modules) = 2
modules = [m.cuda() for m in modules]
model = Interleaved1F1B(modules, chunks=32)

for x, y in dataloader:
    losses, outputs = model.forward_backward(x, criterion=loss_fn, labels=(y,), return_outputs=True)
    if rank == world_size - 1:
        loss = losses.sum().item()  # losses: torch.Size([32])

# eval
with torch.no_grad():
    out = model(x)
    if rank == world_size - 1:
        # calculate metrics ...
数据并行和流水线并行组合
haiscale 还支持同时使用 DDP 和流水线并行。比如我们有 16 块 GPU,我们可以把这 16 块 GPU 划分成两个组,每个组有 8 块 GPU,然后两个组之间做数据并行,组内做流水线并行。
看如下使用示例:
from haiscale.ddp import DistributedDataParallel as DDP
from haiscale.pipeline import PipeDream, partition, make_subgroups

dist.init_process_group(...)
torch.cuda.set_device(local_rank)
rank, world_size = dist.get_rank(), dist.get_world_size()

dp_group, pp_group = make_subgroups(pp_size=8)

model = nn.Sequential(...)
model = partition(model, pp_group.rank(), pp_group.size())

model = DDP(model.cuda(), process_group=dp_group)
model = PipeDream(model, chunks=64, process_group=pp_group)

criterion = nn.MSELoss()

for x, y in dataloader:
    model.forward_backward(x, criterion=criterion, labels=(y,))
CPU Offload
除了以上的并行策略,在深度学习的训练过程中,我们常常会遇到显存不足的问题。
haiscale.cpu_offload.CPUOffload 能够帮助我们在训练中把一部分需要保存的中间变量移动到 CPU 内存上,然后在反向传播时把需要用到的 tensor 传输回 GPU 显存里,从而达到节省显存的目的。
haiscale 采用异步传输拷贝策略,能够把一部分的传输时间和 GPU 的计算重叠起来,从而减少拷贝带来的开销,提升整体计算效率。
使用时需要指定 offload_ratio 参数,其代表需要 offload 的中间变量的比例,offload_ratio=1 代表所有保存的中间变量都会被移动到 CPU 内存里。
以下是使用示例:
from haiscale.cpu_offload import CPUOffload

model = MyModel().cuda()
optimizer = torch.optim.AdamW(model.parameters(), lr=0.01)

for x, y in dataloader:
    optimizer.zero_grad()
    with CPUOffload(offload_ratio=0.1, tag="MyModel"):
        output = model(x)
    loss_fn(y, output).backward()
    optimizer.step()


